Would you like to know how to dehydrate kiwi fruit? This is a little different type of fruit to dehydrate because it’s not a really sweet fruit.
It’s a perfect fruit to dehydrate because it dries fairly quickly, depending on the humidity in the location where you’re drying it.
Today this batch took 16 hours to dehydrate because I sliced them 1/4-inch thick instead of 1/8-inch for dehydrated kiwi chips.
- Prep Time 30 mins
- Dehydrating Time 16 hrs
- Total Time 16 hrs 30 mins
Ingredients
- 10-15 Kiwi, soak or wash. Cut the ends off. Slice into 1/8 to 1/4-inch slices. I did 1/4-inch slices today.
Instructions
- We soaked the Kiwi in a bowl of water hoping it would wash off some of the “fuzzy” stuff. It washed some of it off.
- Then we cut the ends off so they would be ready to slice 1/4-inch thick. You can slice them thinner (1/8-inch thick) with a mandolin, we used a good knife. The Kiwi was absolutely perfect, with no bruises, and no mushy spots.
- We sliced these 1/4-inch thick or very close to 1/4-inch thick.
- Next, you place the sliced Kiwi evenly onto your dehydrating racks. Luckily my racks have screens. I would worry the Kiwi may stick to the wire racks available these days as they dry.
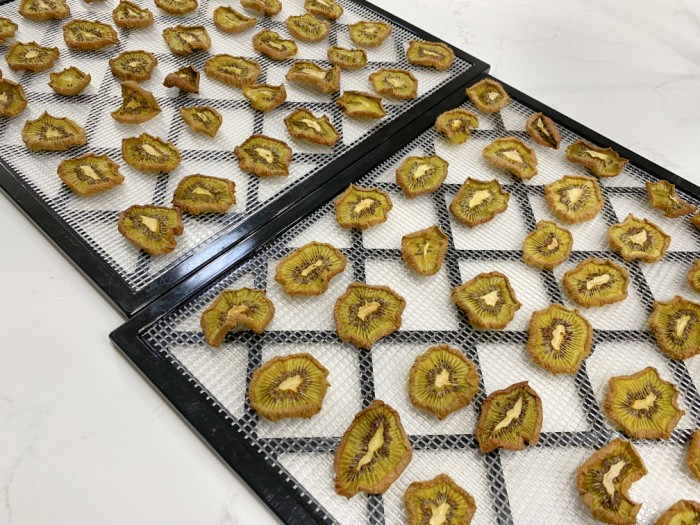
- We set the Excalibur Dehydrator at (135°F ) = (57°C) degrees. It’s so fun to see these shelves ready to dehydrate. Life is so good with the food we preserve.
- Please check your own machine for the correct temperature to dry them. The time will always depend on the humidity in the room where you are dehydrating. Today these took sixteen hours to dry. I dried them until they were leathery, pliable, and would easily break. These are great for garnishes or fruit compotes. No chemicals or preservatives. It’s a naturally healthy sweet and tart snack
How do I know when they are done?
They should be leathery, pliable, and break easily. If not, turn your dehydrator back on and check them again in a few hours. Kiwi does have a fairly high water content, so it does take a while to complete the dehydration process.
How To Condition Your Fruit or Vegetables
If you live where it is HUMID: “To condition the fruit, take the dried fruit that has cooled and pack it loosely in plastic or glass jars. Seal the containers and let them stand for 7 to 10 days. The excess moisture in some pieces will be absorbed by the drier pieces. Shake the jars daily to separate the pieces and check the moisture
I used to live in the DRY DESERT: I set my fruit and vegetables on my countertop for 5-7 days. Ten days is even better to make sure everything is dry before using your FoodSaver unit.
How long can I store my dehydrated kiwi?
When Mark and I took our Master Canner Preserver Classes, we were instructed for safety reasons, to only store home-dehydrated fruit or vegetables for a year. When the fruit or vegetables are dry after the conditioning period, I place them in pint or quart mason jars and use my FoodSaver to seal them.
A FoodSaver and the FoodSaver Jar Sealer are what I use. I don’t use oxygen absorbers because I only dehydrate what I will eat within the year.
What are the health benefits of Kiwi?
Nutrients in the food we eat are very important. Kiwis are low in calories and high in vitamins C, E, and K, and potassium and folate. They have antioxidants we all need, they contain fiber for digestive health, and minerals as well. The serotonin in kiwi fruit is known to help with sleep. Since an average kiwi has only 42 calories, it may help you with weight control.
How can I use dehydrated Kiwi?
- Snacks
- Add to fruit salads (cut into bite-size pieces)
- Place them on a charcuterie or cheese board
- Cut into pieces for granola or mix with your cereal
- Smoothie bowls
- Add pieces to baked goods before baking
- Mix in with your yogurt
Can I dehydrate these in the oven?
Yes, you can. In fact, some ovens now come with a dehydrating feature. If you don’t want to invest in a dehydrator, set your oven as low as possible. The lowest I can set my oven is 170 degrees. This is the recommended temperature for oven dehydration. For oven dehydration, slice the kiwi into 1/8-inch slices because it would take way too many hours to dehydrate the 1/4-inch slices I used today. Place your slices on parchment paper on a cookie sheet.
You may even have a convection button on your oven, which would be awesome because the air will circulate around the food to dry it more evenly. Just keep in mind you must keep an eye on the tray you have dehydrating or they may get too hot and burn. If your oven will not go below 200 degrees, prop the oven door open with a ball of foil.
Final Word
There is something awesome about preserving our own food, don’t you agree? Some of us can no longer have fruit trees or large gardens. That’s okay, you can hopefully go to your local Farmer’s Market and preserve what is in season. Please keep prepping, we must. May God Bless this world, Linda


